
This post may contain affiliate links.
As the crisp autumn air settles in and the excitement of game day approaches, I can’t help but reminisce about the cherished traditions that come with it. Growing up, our family would gather around the television, decked out in our team colors, ready to cheer on our favorite players. But what truly made those days special were the sweet treats that accompanied the game. One of my all-time favorites? Easy Tailgate Dessert Bars.
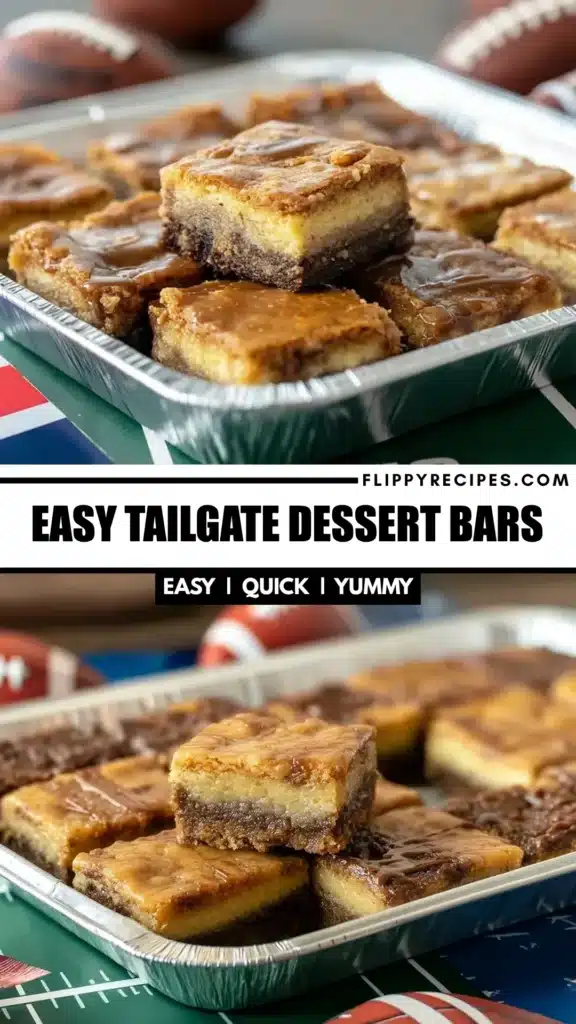
These bars are more than just a dessert; they’re a symbol of togetherness and joy. The moment you pull them from the oven, the rich aroma of chocolate fills the air, wrapping around you like a warm hug. Each bite is a delightful combination of fudgy goodness, with a hint of sweetness that dances on your palate. The chocolate chips melt into a gooey center, while the edges offer a slight crispness, creating a perfect balance of textures.
Whether you’re tailgating in a parking lot or hosting a cozy gathering at home, these Easy Tailgate Dessert Bars are the ultimate crowd-pleaser. They’re portable, easy to share, and can be customized to suit everyone’s taste. Imagine the smiles on your friends’ faces as they indulge in these delectable treats while cheering for their team. It’s moments like these that remind me why I love cooking and sharing food with loved ones.
What is Easy Tailgate Dessert Bars?
When we think of dessert bars, we’re diving into a delightful chapter of American culinary history. Originating in the mid-20th century, dessert bars have evolved from simple cookie recipes into a versatile treat that can be customized in countless ways. These bars are essentially a cross between cookies and brownies, offering a rich, fudgy texture that’s easy to slice and serve. They’ve become a staple in many households, especially during festive occasions like game day.
Speaking of game day, tailgating traditions are a vibrant part of American culture, especially in the fall. Picture this: friends and family gather in parking lots, grilling up burgers, tossing around footballs, and sharing laughter. Amidst the savory aromas, dessert bars like these Easy Tailgate Dessert Bars shine as the perfect sweet ending to a hearty meal. Their portability makes them an ideal choice for tailgating; you can easily pack them up and share with fellow fans, creating a sense of community and celebration.
These bars are not just desserts; they’re game day treats that bring people together. Whether you’re enjoying them at a stadium or in your living room, they embody the spirit of camaraderie and joy. Plus, their easy-to-eat nature means you can indulge without missing a moment of the action. So, as you prepare for your next gathering, remember that these portable desserts are more than just a sweet treat—they’re a delicious way to enhance your game day experience!
Why You’ll Love This Easy Tailgate Dessert Bars
There’s something truly special about Easy Tailgate Dessert Bars that makes them a must-have for any gathering. First and foremost, their quick and easy preparation fits seamlessly into even the busiest of schedules. With just 15 minutes of prep time, you can whip up a batch that will have everyone raving.
But it’s not just about convenience; the rich, chocolatey flavor satisfies those sweet cravings that often hit during game day. Each bite is a delightful explosion of fudgy goodness, making it hard to resist going back for seconds (or thirds!).
What I love most is the versatility of this recipe. You can customize these bars with various mix-ins, from nuts to dried fruits, or even different types of chocolate. This means you can cater to everyone’s taste preferences, ensuring that there’s something for everyone to enjoy.
Finally, these bars are perfect for sharing with friends and family during game day celebrations. Their portable nature makes them easy to pack up and take along, allowing you to spread joy and sweetness wherever you go. Trust me, when you bring these Easy Tailgate Dessert Bars to the party, you’ll be the star of the show!
Who It’s For
These dessert bars are ideal for busy families looking for quick dessert options that don’t skimp on flavor. If you’re a health-conscious cook, you’ll appreciate how easy it is to indulge without feeling guilty, especially with the option to swap in healthier mix-ins.
And for food lovers who enjoy trying new recipes, this is a fantastic way to experiment with flavors and textures. You can make them your own, adding a personal touch that reflects your culinary style.
When to Cook It
Wondering when to whip up these delicious bars? They’re perfect for a variety of occasions! Whether it’s game day, family gatherings, or casual get-togethers, these Easy Tailgate Dessert Bars fit right in.
Plus, they make a great make-ahead option for busy weekends. Bake a batch on a Friday, and you’ll have a sweet treat ready to go for Saturday’s festivities. It’s a win-win!
How to Make the Perfect Easy Tailgate Dessert Bars
Ingredients
To create these Easy Tailgate Dessert Bars, you’ll need a handful of simple ingredients that come together to form a rich, chocolatey treat. Here’s what you’ll need:
- 1 cup all-purpose flour: This is the base of your bars, providing structure and a soft texture.
- 1/2 cup unsweetened cocoa powder: This gives the bars their deep chocolate flavor, making them irresistibly fudgy.
- 1/2 cup granulated sugar: Adds sweetness and helps create that delightful chewy texture.
- 1/4 cup brown sugar: This adds moisture and a hint of caramel flavor, enhancing the overall taste.
- 1/2 cup unsalted butter, melted: Provides richness and helps bind the ingredients together.
- 2 large eggs: Essential for structure and moisture, giving the bars a lovely, soft crumb.
- 1 teaspoon vanilla extract: A must for flavor, it elevates the chocolate notes beautifully.
- 1/2 cup chocolate chips: These melt into gooey pockets of chocolate goodness throughout the bars.
- 1/4 cup chopped nuts (optional): Adds a delightful crunch and can be customized to your preference.
If you’re looking for alternatives, consider using coconut oil instead of butter for a dairy-free option, or swap in your favorite nut butter for a unique twist. You can also mix in dried fruits or different types of chocolate to make these bars your own!
Step-by-Step Instructions
Now, let’s dive into the baking process! Making these Easy Tailgate Dessert Bars is a breeze, and I promise the aroma wafting through your kitchen will be irresistible.
- Preheat your oven to 350°F (175°C) and grease a 9×9 inch baking pan.
- In a large bowl, mix together the flour, cocoa powder, granulated sugar, and brown sugar until well combined.
- Add the melted butter, eggs, and vanilla extract to the dry ingredients. Mix until everything is just combined; be careful not to overmix!
- Fold in the chocolate chips and nuts if you’re using them. This is where you can get creative with your mix-ins!
- Pour the batter into the prepared baking pan and spread it evenly.
- Bake for 25-30 minutes or until a toothpick inserted in the center comes out clean. The edges should look set, while the center remains slightly soft.
- Let the bars cool in the pan before cutting them into squares and serving. Trust me, the wait will be worth it!
As you bake, enjoy the delightful scents filling your home. These Easy Tailgate Dessert Bars are not just a treat; they’re a celebration of flavors that bring everyone together.
For People with Diabetes: Sugar Substitutes
If you’re looking to enjoy these Easy Tailgate Dessert Bars while managing sugar intake, there are several suitable sugar substitutes you can use:
- Stevia: A natural sweetener that’s much sweeter than sugar, so use it sparingly.
- Monk fruit: Another natural option that provides sweetness without calories.
- Erythritol: A sugar alcohol that has minimal impact on blood sugar levels.
- Allulose: A low-calorie sweetener that tastes similar to sugar without the calories.
However, I advise against using honey or maple syrup, as they can spike blood sugar levels. With these alternatives, you can still enjoy the deliciousness of these dessert bars without compromising your health!
Kitchen Tools You’ll Need
Before you start baking these Easy Tailgate Dessert Bars, it’s essential to gather the right tools. Having the right kitchen equipment can make the process smoother and more enjoyable. Here’s a list of essential tools you’ll need:
- Mixing Bowls: A set of mixing bowls in various sizes will help you combine your ingredients easily. If you don’t have mixing bowls, any large, deep dish will do!
- Baking Pan: A 9×9 inch baking pan is perfect for this recipe. If you don’t have one, you can use an 8×8 inch pan, but keep an eye on the baking time as it may vary slightly.
- Whisk: A whisk is great for mixing your dry ingredients and incorporating the wet ones. If you don’t have a whisk, a fork or a spoon can work in a pinch!
- Spatula: A rubber or silicone spatula is ideal for folding in chocolate chips and spreading the batter evenly in the pan. If you don’t have one, a wooden spoon can also do the trick.
- Measuring Cups and Spoons: Accurate measurements are key to baking success. If you don’t have measuring cups, you can use a standard coffee mug or a tablespoon for rough estimates.
- Cooling Rack: While not essential, a cooling rack helps your bars cool evenly. If you don’t have one, simply let them cool in the pan for a bit longer before transferring them to a plate.
With these tools in hand, you’re all set to create your delicious Easy Tailgate Dessert Bars. Happy baking!
Additional Tips from Well-Known Chefs
When it comes to baking Easy Tailgate Dessert Bars, a few chef-approved hacks can elevate your treats from good to unforgettable. Here are some tips that I’ve gathered from culinary experts that you can easily incorporate into your baking routine:
- Add a Pinch of Salt: Renowned chef Thomas Keller often emphasizes the importance of salt in desserts. A small pinch of sea salt can enhance the sweetness of your bars, creating a delightful contrast that makes the chocolate flavor pop.
- Use High-Quality Chocolate: Chef Jacques Torres, known as “Mr. Chocolate,” suggests using high-quality chocolate chips or chunks for a richer flavor. The better the chocolate, the more indulgent your Easy Tailgate Dessert Bars will taste.
- Experiment with Extracts: Adding a splash of almond or coffee extract can deepen the flavor profile of your bars. Chef Ina Garten often uses extracts to add complexity to her desserts, and it’s a simple way to make your bars stand out.
- Incorporate Zest: For a refreshing twist, consider adding citrus zest, like orange or lemon, to the batter. Chef Giada De Laurentiis frequently uses zest in her recipes to brighten flavors, and it works wonders in chocolate desserts too!
- Chill the Dough: If you have time, chilling the batter for about 30 minutes before baking can help the bars maintain their shape and create a denser texture. This tip is often shared by pastry chefs who want to achieve that perfect fudgy consistency.
These tips not only enhance the flavor and texture of your Easy Tailgate Dessert Bars but also allow you to channel your inner chef. So, the next time you whip up a batch, consider these expert insights to impress your friends and family!
Storing and Reheating Tips
Once you’ve baked your delicious Easy Tailgate Dessert Bars, you’ll want to ensure they stay fresh and tasty for as long as possible. Here’s how to store and reheat them effectively:
Storing Your Dessert Bars
- Cool Completely: Before storing, allow your bars to cool completely in the pan. This prevents condensation from forming, which can make them soggy.
- Airtight Container: Place the cooled bars in an airtight container. This will help keep them moist and prevent them from absorbing any unwanted odors from your fridge.
- Layering: If you’re stacking the bars, place a piece of parchment paper between layers to avoid sticking. This way, you can easily grab one without tearing the others apart.
- Room Temperature: These bars can be stored at room temperature for up to a week. Just make sure they’re kept in a cool, dry place away from direct sunlight.
Freezing for Later
If you want to enjoy your Easy Tailgate Dessert Bars at a later date, freezing is a great option:
- Wrap Individually: Cut the bars into squares and wrap each piece tightly in plastic wrap. This helps maintain their freshness and prevents freezer burn.
- Use a Freezer Bag: Place the wrapped bars in a freezer-safe bag or container. Be sure to label it with the date so you can keep track of how long they’ve been stored.
- Freezing Duration: These bars can be frozen for up to three months. When you’re ready to enjoy them, simply remove the desired amount and let them thaw at room temperature.
Reheating Tips
To bring back that fresh-baked taste, reheating your Easy Tailgate Dessert Bars is simple:
- Microwave: Place a bar on a microwave-safe plate and heat for about 10-15 seconds. This will warm it up and make the chocolate chips gooey again.
- Oven: For a more even heat, preheat your oven to 350°F (175°C) and place the bars on a baking sheet. Heat for about 5-10 minutes, just until warmed through.
By following these storing and reheating tips, you can enjoy your Easy Tailgate Dessert Bars at their best, whether you’re indulging right after baking or savoring them later on. Happy snacking!
Common Mistakes to Avoid
Baking can be a delightful experience, but it’s easy to make a few missteps along the way. Here are some common pitfalls to watch out for when making your Easy Tailgate Dessert Bars, along with tips to ensure perfect results every time:
- Overmixing the Batter: Mixing too much can lead to tough bars. Aim to mix until just combined; a few lumps are perfectly fine!
- Not Greasing the Pan Properly: If you skip greasing the pan, your bars may stick. Use butter or cooking spray to ensure easy removal.
- Incorrect Oven Temperature: Always preheat your oven. An oven that’s too hot can burn the edges while leaving the center undercooked. Invest in an oven thermometer for accuracy!
- Skipping the Cooling Time: Cutting the bars too soon can result in a crumbly mess. Allow them to cool in the pan for at least 10-15 minutes before slicing.
- Using Old Ingredients: Fresh ingredients make a difference! Check the expiration dates on your baking powder and cocoa powder for the best flavor and texture.
- Not Measuring Ingredients Accurately: Baking is a science, so precise measurements are crucial. Use measuring cups and spoons for accuracy, and level off dry ingredients with a knife.
By avoiding these common mistakes, you’ll be well on your way to creating delicious Easy Tailgate Dessert Bars that will impress your friends and family. Happy baking!
FAQs About Easy Tailgate Dessert Bars
As you prepare to whip up your Easy Tailgate Dessert Bars, you might have a few questions. Here are some common queries I’ve encountered, along with helpful answers to guide you:
Q1: Can I make these dessert bars ahead of time?
Yes! These bars are perfect for making ahead of time. You can bake them a day or two in advance, allowing the flavors to meld beautifully. Just store them in an airtight container at room temperature, and they’ll be ready to impress your guests when game day arrives!
Q2: Are there gluten-free options for this recipe?
It depends. To make these Easy Tailgate Dessert Bars gluten-free, you can substitute the all-purpose flour with a gluten-free flour blend. Just ensure that the blend you choose is suitable for baking, and you should achieve a delicious result!
Q3: How can I make these bars more festive for a party?
Yes! To add a festive touch, consider drizzling melted chocolate or caramel over the top before serving. You can also sprinkle colorful sprinkles or chopped nuts for added texture and visual appeal. For a seasonal twist, try incorporating spices like cinnamon or nutmeg into the batter!
Q4: Can I use different types of chocolate?
Yes! Feel free to experiment with different types of chocolate in your Easy Tailgate Dessert Bars. You can use milk chocolate, dark chocolate, or even white chocolate chips. Mixing different chocolates can create a delightful flavor profile that everyone will love!
Q5: What’s the best way to cut these bars?
It depends. For clean cuts, allow the bars to cool completely in the pan before slicing. Use a sharp knife and wipe it clean between cuts to maintain neat edges. If you prefer, you can also use a pizza cutter for quick, even slices!
Conclusion: Final Thoughts on Easy Tailgate Dessert Bars
As I reflect on the joy of sharing food during celebrations, I can’t help but feel a warm sense of nostalgia. Food has a magical way of bringing people together, creating memories that linger long after the last bite. These Easy Tailgate Dessert Bars are more than just a sweet treat; they embody the spirit of camaraderie and the excitement of game day. Each bar is a little piece of happiness, perfect for sharing with friends and family as you cheer on your favorite team.
I encourage you to try this recipe and experience the delight of baking these bars in your own kitchen. Whether you’re tailgating in a parking lot or hosting a cozy gathering at home, I promise these bars will be a hit. Don’t forget to share your experiences in the comments below! I’d love to hear how you customized your bars and the smiles they brought to your loved ones.
Lastly, if you enjoyed this recipe, please share it with your friends and family. Let’s spread the joy of baking and the love of delicious treats together. Happy baking, and may your game day be filled with laughter, excitement, and, of course, plenty of Easy Tailgate Dessert Bars!
Print
Easy Tailgate Dessert Bars: Whip Up These Irresistible Treats for Your Next Game Day!
- Total Time: 45 minutes
- Yield: 16 bars 1x
- Diet: Vegetarian
Description
Delicious and easy-to-make dessert bars perfect for tailgating and game day celebrations.
Ingredients
- 1 cup all-purpose flour
- 1/2 cup unsweetened cocoa powder
- 1/2 cup granulated sugar
- 1/4 cup brown sugar
- 1/2 cup unsalted butter, melted
- 2 large eggs
- 1 teaspoon vanilla extract
- 1/2 cup chocolate chips
- 1/4 cup chopped nuts (optional)
Instructions
- Preheat your oven to 350°F (175°C) and grease a 9×9 inch baking pan.
- In a large bowl, mix together the flour, cocoa powder, granulated sugar, and brown sugar.
- Add the melted butter, eggs, and vanilla extract to the dry ingredients and mix until well combined.
- Fold in the chocolate chips and nuts if using.
- Pour the batter into the prepared baking pan and spread it evenly.
- Bake for 25-30 minutes or until a toothpick inserted in the center comes out clean.
- Let the bars cool in the pan before cutting into squares and serving.
Notes
- These bars can be stored in an airtight container for up to a week.
- Feel free to customize with your favorite mix-ins like dried fruit or different types of chocolate.
- Prep Time: 15 minutes
- Cook Time: 30 minutes
- Category: Dessert
- Method: Baking
- Cuisine: American
Nutrition
- Serving Size: 1 bar
- Calories: 150
- Sugar: 10g
- Sodium: 50mg
- Fat: 7g
- Saturated Fat: 4g
- Unsaturated Fat: 2g
- Trans Fat: 0g
- Carbohydrates: 20g
- Fiber: 1g
- Protein: 2g
- Cholesterol: 30mg